How to Build an MCP Server (Step-by-Step Guide) 2026
TL;DR: Build a custom MCP server to connect LLMs like Claude to ClickUp for automated task management. Learn how to set up and integrate APIs, define tools, and deploy, enabling AI to retrieve and create ClickUp tasks.
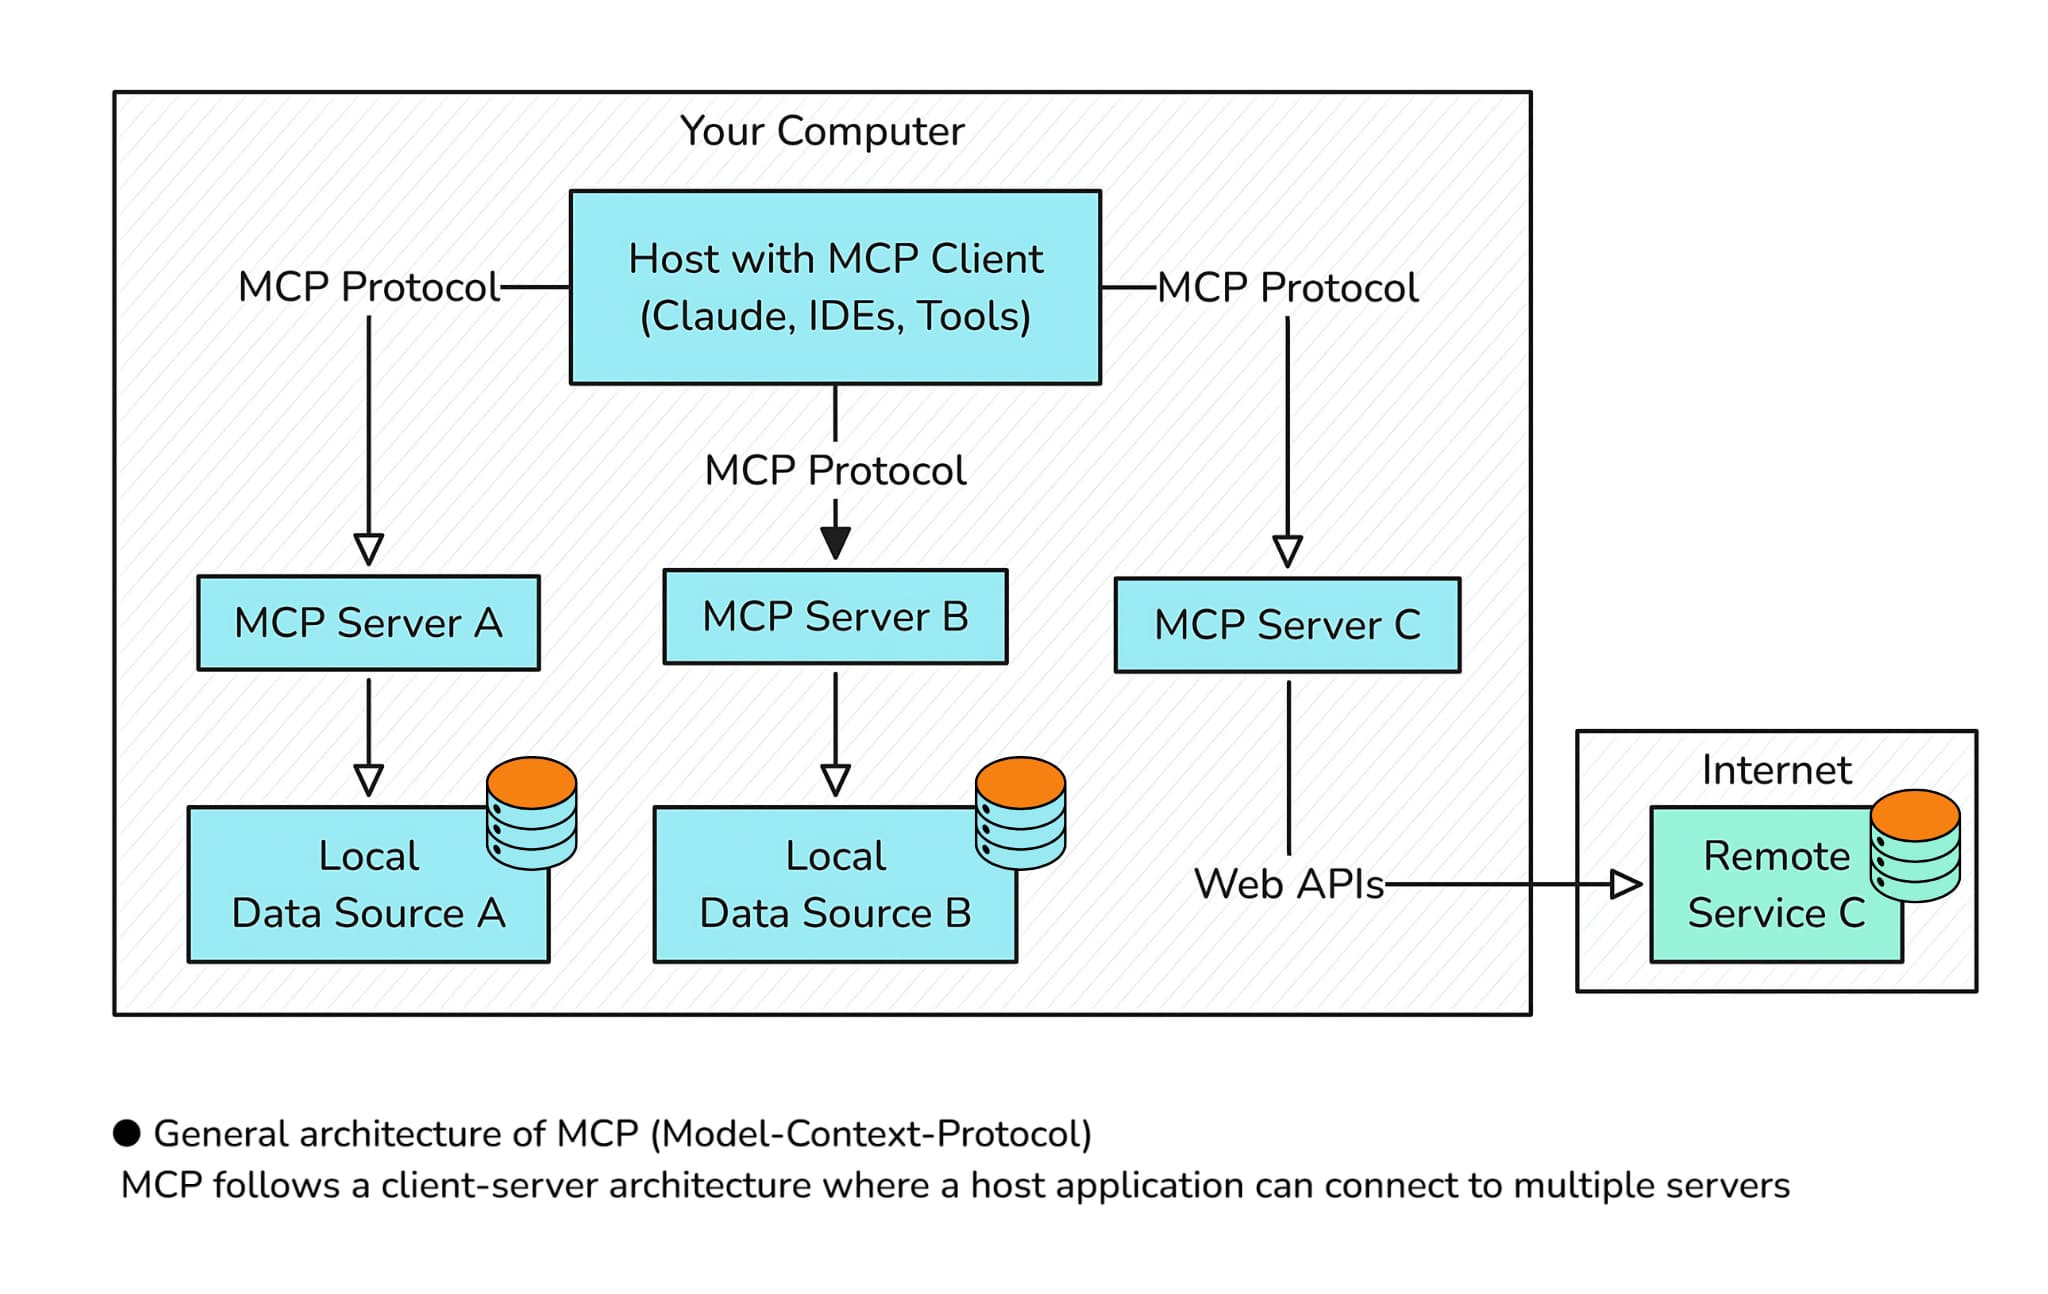
What is MCP and why is it useful?

The Model Context Protocol (MCP) allows Large Language Models (LLMs) like Claude to talk to external systems and APIs. Unlike traditional AI integrations that require custom connectors, MCP provides a standard way for LLMs to communicate with different services.
MCP servers act as smart bridges - allowing AI assistants to get data, take actions, and integrate with tools beyond their training data. This means LLMs can go from just being text generators to active participants in your digital ecosystem.
In this guide, we’ll build a practical MCP server that connects to ClickUp - showing you how MCP allows AI assistants to pull task details and add new tasks in a working project management platform.
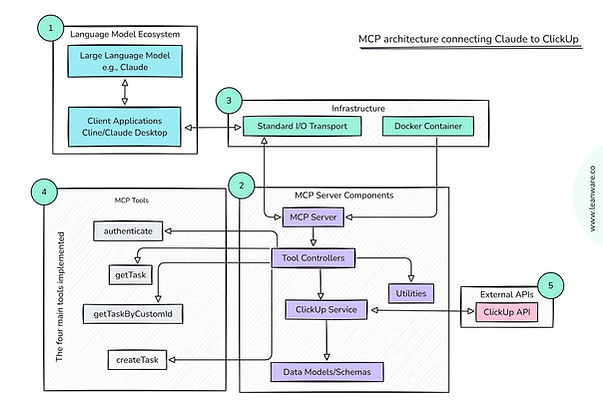
Overview of the ClickUp MCP Server
Our MCP server for ClickUp will enable language models to:
- Authenticate with the ClickUp API
- Retrieve task information by standard ID or custom ID
- Create new tasks with various parameters including descriptions, priorities, due dates, and tags
Prerequisites for Building an MCP Server
First, make sure you have:
- Node.js (v22 or higher) - JavaScript runtime environment
- npm or yarn - Package manager for JavaScript
- ClickUp account with API access - Required for authentication
- Docker (optional, for deployment) - Containerization platform
Familiarity with TypeScript is helpful but not required - we'll explain the important concepts as we move along.
Step-by-Step Guide: Building a ClickUp MCP Server
Step 1: Set Up the Development Environment
Let's start by creating a structured project foundation:
Next, install the necessary dependencies:
The key packages here are:
- @modelcontextprotocol/sdk: Core library for creating MCP servers
- dotenv: Manages environment variables securely
- zod: Provides runtime type validation
Now, configure TypeScript by creating a tsconfig.json file in the project root:
Finally, create the folder structure to separate concerns:
- controllers: Handle incoming requests and define the tools
- services: Contain business logic and API communication
- models: Define data structures and validation
- utils: Provide helper functions
Step 2: Get ClickUp Credentials
To communicate with the ClickUp API, we need proper authentication:
1. Obtain your ClickUp API Token
- Log in to your ClickUp account
- Go to your profile settings (bottom-left corner)
- Select "Settings" → "Apps"
- Under "API Token", click "Generate" if you don't already have one
- Copy the generated token
2. Find your Workspace ID
- Open ClickUp in your browser
- Look at the URL when you're in your workspace
- The Workspace ID is the numeric value in the URL: https://app.clickup.com/{workspace_id}/home
- Copy this number
3. Configure Environment Variables
Create a .env file in the project root:
Step 3: Define Data Models
Data models provide structure for information in our application, ensuring consistency and type safety when working with the ClickUp API.
1. Create Types and Schemas
These define the shape of data objects that will be used throughout the application:
- src/models/types.ts file:
2. Define Validation Schemas with Zod
Zod provides runtime validation to ensure the data we send and receive matches what we expect:
- src/models/schema.ts file:
Step 4: Implement the ClickUp Service
The service layer encapsulates all interactions with the ClickUp API, keeping our code modular and easier to maintain.
1. Create the Base Service
This establishes the foundation for communicating with the ClickUp API:
- src/services/clickup-service.ts file:
2. Add Methods for Tasks
These methods provide specific functions to interact with tasks in ClickUp:
Add to the ClickUpService class:
Step 5: Create Utilities for Tool Definitions
Utilities help standardize how we define and handle MCP tools, making our code more consistent and reducing repetition.
1. Implement Tool Definition Utility
An MCP tool is a function that the language model can call to perform a specific action. This utility provides a consistent way to define these tools:
src/utils/defineTool.ts file:
2. Create Error Handling Utility
Standardized error handling ensures consistent responses when errors occur:
src/utils/errors.ts file:
Step 6: Implement Controllers with Tool Definitions
Controllers define the actual tools that our MCP server will expose to language models. These are the functions Claude can call to interact with ClickUp.
Create src/controllers/clickup-controller.ts:
Step 7: Implement the Main Entry Point
The main entry point initializes the MCP server, registers all tools, and connects to the standard I/O transport for communication with language models.
Create the src/index.ts file:
Step 8: Configure Scripts for Building and Running
Setting up scripts in package.json provides convenient shortcuts for common tasks like building and running the application.
Update the package.json file:
Step 9: Build and Test the Server
Compiling and testing the server ensures that everything is working correctly before deployment.
1. Build the Project
2. Test with the MCP Inspector
The MCP inspector is a tool that allows you to manually test your MCP server by simulating calls from a language model:
Step 10: Create Dockerfile for Deployment
Docker ensures consistent deployment across environments by packaging applications into lightweight, standalone containers with all necessary dependencies.
Create a Dockerfile in the project root:
Step 11: Build and Publish Docker Image
Creating and publishing a Docker image makes the server available for deployment in various environments.
Step 12: Configure Tools that Support MCP
Setting up your MCP server in MCP-compatible tools enables language models to use the tools you've created.
Configuration in Cline (VSCode or JetBrains)
Cline is an extension for development environments that allows you to use Claude with MCP servers directly in your code editor:
- Open VSCode or JetBrains IDEs and go to Cline
- Go to MCP Servers → Installed → Configure MCP Servers
- Add the following to your cline_mcp_settings.json inside the mcpServers key:
Configuration in Claude Desktop
Claude Desktop is a standalone application for interacting with Claude:
1. Open the Claude Desktop configuration file:
- Windows: C:\Users\YourUsername\AppData\Roaming\Claude\claude_desktop_config.json
- Mac: ~/Library/Application\ Support/Claude/claude_desktop_config.json
2. Add the same configuration as in Cline to your claude_desktop_config.json inside the mcpServers key
3. Save the configuration file
4. Restart Claude Desktop to apply the changes
Testing and Debugging Your MCP Server
1. Authentication Errors
If you're having trouble authenticating with ClickUp:
- Verify your API token is correct
- Ensure the API token has the necessary permissions for the operations you're attempting
- Check that your workspace ID is correct
2. Task Access Issues
If you can't access specific tasks:
- Confirm you have access to the tasks you're trying to retrieve
- Verify the task IDs are correct and exist in your workspace
- Check if the tasks might be in an archived state
3. Connection Problems
If your MCP server isn't connecting properly:
- Ensure your Docker service is running properly
- Check your network connection
- Verify the environment variables are correctly set in your MCP configuration
Repository
You can find the full source code for the ClickUp MCP server here: GitHub repository.
License
This MCP server is licensed under the MIT License.
Writing Unit Tests for MCP Functions
To ensure reliability, implement unit tests for your MCP functions:
Deploying the MCP Server
Deploying with Docker
Docker simplifies deployment by packaging everything needed to run your server:
- Build your image: docker build -t clickup-mcp-server .
- Run the container: docker run -i --rm -e CLICKUP_API_TOKEN=your-token -e CLICKUP_WORKSPACE_ID=your-id clickup-mcp-server
For production environments, consider using Docker Compose for easier configuration management.
Running the MCP Server on Cloud Platforms
Your MCP server can run on any cloud platform that supports Docker:
- AWS: Deploy as an ECS task or Lambda container
- Google Cloud: Run on Cloud Run or GKE
- Azure: Deploy to Azure Container Instances
The main requirements are: support for environment variables to store credentials, standard I/O access for MCP communication, and network connectivity to the ClickUp API.
Alternative Deployment Options (Without Docker)
If Docker isn't an option, you can deploy directly:
- Clone the repository on your server
- Install dependencies: npm install --production
- Build the TypeScript: npm run build
- Run the server: CLICKUP_API_TOKEN=your-token CLICKUP_WORKSPACE_ID=your-id node dist/index.js
API Authentication and Security Best Practices
When building MCP servers that access external APIs:
- Never hardcode credentials in your codebase
- Use environment variables or secure secrets management
- Implement proper error handling for authentication failures
- Consider implementing token rotation for long-running services
- Add request validation to prevent injection attacks
Optimizing MCP Server Performance
To ensure your MCP server responds quickly:
- Implement caching for frequently accessed data
- Use connection pooling for database or API connections
- Optimize response sizes by filtering unnecessary fields
- Implement timeout handling for long-running operations
- Consider implementing rate limiting to prevent API abuse
Logging and Monitoring for Production
For production deployments:
- Add structured logging to capture important events
- Implement health checks for container orchestration
- Set up monitoring for response times and error rates
- Create alerting for critical failures
- Consider implementing tracing for complex requests
Integrating MCP Server with External Tools
Connecting MCP Server to Other Services
The same patterns used for ClickUp can be applied to other services:
- Identify the API endpoints you need to access
- Create service classes for each external API
- Define MCP tools that map to those API functions
- Implement proper authentication and error handling
Typical integrations are Slack notifications, Linear for issue tracking, and Google Docs for document generation.
Extending Functionality with Custom Plugins
As your MCP server grows, consider a plugin architecture:
This makes your server more modular and easier to maintain.
Troubleshooting and FAQs
Common errors and how to fix them:
Error | Solution |
CLICKUP_API_TOKEN not set | Ensure the environment variable is set correctly |
API rate limit exceeded | Use exponential backoff and retry logic |
Invalid response format | Ensure Zod schemas match API responses |
MCP transport disconnected | Check and maintain the standard I/O connection |
How to Handle API Rate Limits
To avoid hitting rate limits:
- Implement request throttling
- Add caching for frequently accessed data
- Use exponential backoff for retries
- Consider batching requests when possible
- Monitor usage patterns to identify optimization opportunities
Your Next Step
If you want lower latency, you can set up multi-region deployments or build specialized MCP servers for real-time streaming. To handle more traffic, try horizontal scaling with Kubernetes, and for better insights, use distributed tracing to spot performance bottlenecks.
Need help scaling your MCP setup, building one, or figuring out a strategy? Contact our experts for enterprise-grade solutions customized to your specific integration needs.